
Hello folks,
Get rid of all standard ways to approve/reject an approval request. In this blog post, I am going to share how we can use screen flow + LWC to make the custom approval request Approve/Reject screen.
First, let’s create a lightning web component. You can design this component as per your requirements, for example, put all the necessary pieces of information approver need to see when they approve or reject the request.
<template>
    <!--lightning record view form to display the leave application fields-->
    <lightning-record-view-form object-api-name={objectApiName}
                                record-id={recordId}>
        <div class="slds-box">

            <lightning-output-field field-name="Previous_Balance_Leave__c"> </lightning-output-field>

            <lightning-output-field field-name="Balance_Leave__c"> </lightning-output-field>

            <lightning-output-field field-name="Start_Date__c"> </lightning-output-field>

            <lightning-output-field field-name="End_Date__c"></lightning-output-field>

            <lightning-output-field field-name="Total_duration__c"> </lightning-output-field>

            <lightning-output-field field-name="Employee_Name__c"> </lightning-output-field>

            <lightning-output-field field-name="Type__c"> </lightning-output-field>
        </div>
    </lightning-record-view-form><br/>
    <!--Approve button-->
    <lightning-button variant="brand" label="Approve" title="Approve leave request" onclick={handleApprove} class="slds-m-left_x-small"></lightning-button>
    <!--Reject button-->
    <lightning-button variant="destructive" label="Reject" title="Reject leave request" onclick={handleReject} class="slds-m-left_x-small"></lightning-button>
</template>
import { LightningElement,api } from 'lwc';

import Leave_Application_OBJECT from '@salesforce/schema/Leave_Application__c';

import approveReject from '@salesforce/apex/leaveApplicationApprovalController.approveRejectRequest';

//import platformShowToastEvent to display toast message
import { ShowToastEvent } from 'lightning/platformShowToastEvent';

export default class LeaveApplicationApproval extends LightningElement {
    //record id
    @api recordId;

    //object info
    objectApiName = Leave_Application_OBJECT;

    //variable to pass in the apex method as parameter
    isRequestApproved = false;

    //handleApprove function to send the approve request to apex.
    handleApprove(){
        this.isRequestApproved = true;
        this.sendRequest();
    }

    //handleReject function is to send the rejection request to apex.
    handleReject(){
        this.sendRequest();
    }
    sendRequest(){
        //call the apex method with, sending 2 parameters 1. leave application record id 2. approva/or reject
        approveReject({ recordIdStr: this.recordId, isApprove:this.isRequestApproved })
            .then((result) => {

                //if record is approved
                if(result == 'Approved'){

                    //display toast message
                    this.dispatchEvent(
                        new ShowToastEvent({
                            title: "Success ! ",
                            message: 'The record has been approved!',
                            variant: "success"
                        })
                    );

                }
                //if record is rejected
                else if(result =='Rejected'){

                    //display toast message
                    this.dispatchEvent(
                        new ShowToastEvent({
                            title: "Success ! ",
                            message: 'The record has been rejected!',
                            variant: "success"
                        })
                    );

                }
                else{

                     //display toast message
                     this.dispatchEvent(
                        new ShowToastEvent({
                            title: "Error ! ",
                            message: result,
                            variant: "error"
                        })
                    );

                }

                this.error = undefined;
            })
            .catch((error) => {

                this.error = error;

                this.dispatchEvent(
                    new ShowToastEvent({
                        title: "Error ",
                        message: 'Record is already approved/rejected.',
                        variant: "error"
                    })
                );
            });
    }

}
leaveApplicationApproval.js-meta.xml
<?xml version="1.0" encoding="UTF-8"?>
<LightningComponentBundle xmlns="http://soap.sforce.com/2006/04/metadata">
    <apiVersion>52.0</apiVersion>
    <isExposed>true</isExposed>
    <masterLabel>Leave Application Approval</masterLabel>
    <description>This is a leave application approval component.</description>
  <targets>
      <target>lightning__FlowScreen</target>
      <target>lightning__RecordPage</target>

  </targets>
  <targetConfigs>
    <targetConfig targets="lightning__FlowScreen,lightning__RecordPage">
            <property name="recordId" type="String" label="Enter record id"/>
    </targetConfig>
  </targetConfigs>
</LightningComponentBundle>
LeaveApplicationApprovalController
public with sharing class LeaveApplicationApprovalController {

    /**
     * @description approveRequest
     */
    @AuraEnabled
    public static String approveRejectRequest(String recordIdStr, Boolean isApprove){
        try{

            String resultString = isApprove ? 'Approved': 'Rejected';

            Leave_Application__c la = [Select Employee__r.OwnerId from Leave_Application__c where id=:recordIdStr];
            User u = [SELECT ManagerID FROM User where id=:la.Employee__r.OwnerId];
            //check if current user is manager of requester.
            Boolean isCurrentUserManagerOfRecordOwner  = (u.ManagerID == UserInfo.getUserId() )? true:false;

            if(isCurrentUserManagerOfRecordOwner){

                ProcessInstance pi = [SELECT Id,Status,TargetObjectId FROM ProcessInstance where Status='Pending' and TargetObjectId = :recordIdStr];

                ProcessInstanceWorkitem piw =  [SELECT Id,ProcessInstanceId FROM ProcessInstanceWorkitem WHERE ProcessInstanceId =:pi.Id];

                Approval.ProcessWorkitemRequest req1 = new Approval.ProcessWorkitemRequest();

                req1.setComments('Your request has been approved!');

                if(isApprove){
                    req1.setAction('Approve'); //to approve use 'Approve'
                }else{
                    req1.setAction('Reject'); //to reject use 'Reject'
                }

                req1.setNextApproverIds(new Id[] {UserInfo.getUserId()});

                // Use the ID from the newly created item to specify the item to be worked
                req1.setWorkitemId(piw.Id);

                if(!Test.isRunningTest()){
                    Approval.ProcessResult result =  Approval.process(req1);
                }

                return resultString;
            }
            else{
                return System.Label.Current_user_is_not_manager_of_record_owner;
            }
        }
        catch(Exception e){ throw new AuraHandledException(e.getMessage()); }
    }
}
Now, create a screen flow and use this lightning web component in the flow.
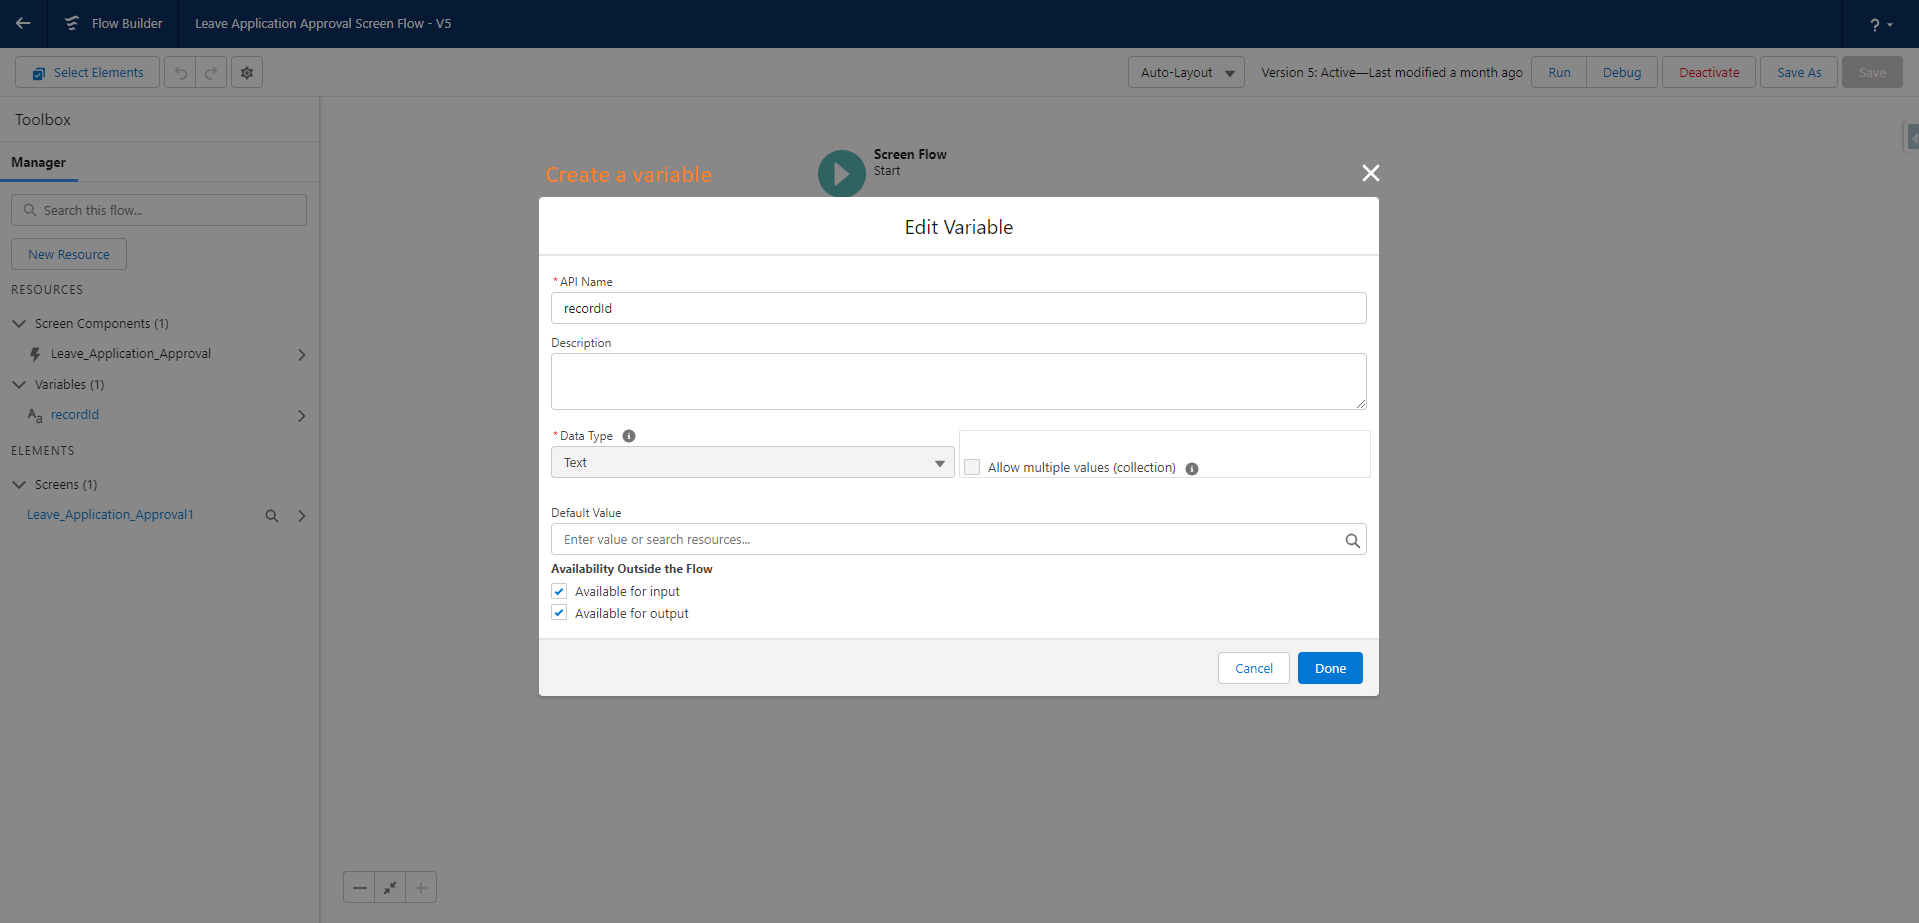
Click on the new resource and create a new variable called “recordId”.
Click on the plus (+) icon and select the screen component. Search the lightning web component name in the search box and drag the component on the screen component.
Enter {!recordId} in “Enter record id” field.
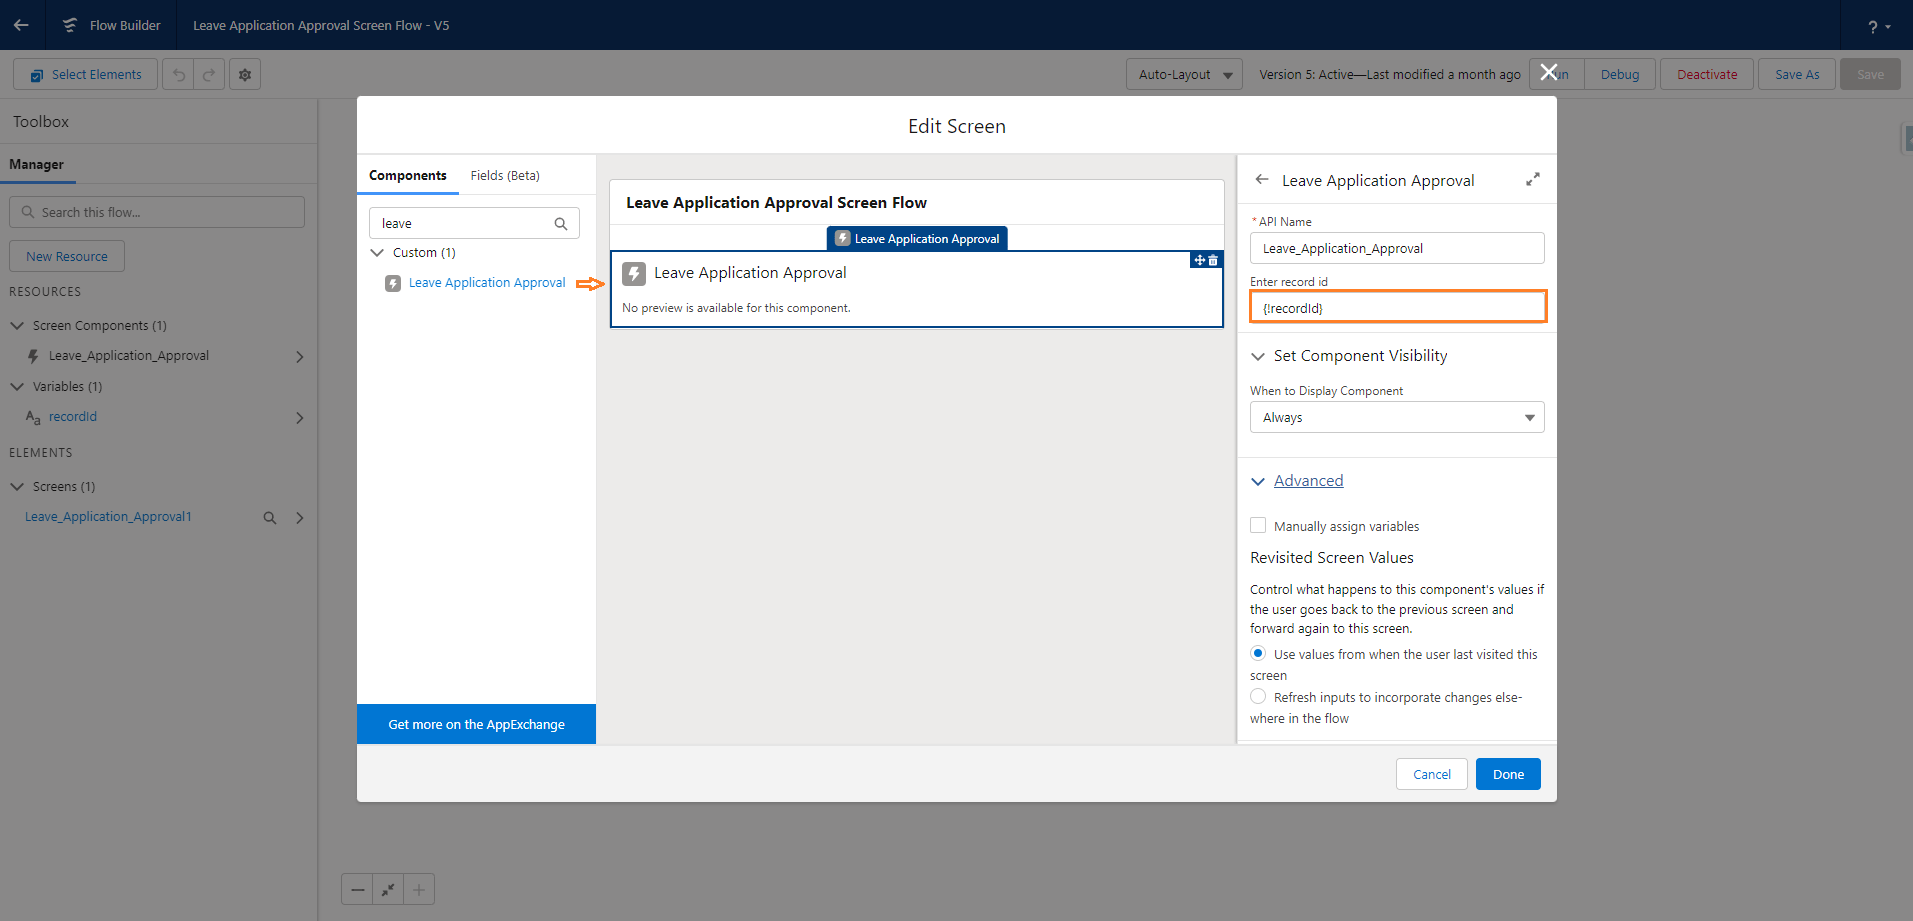
Click Done! and activate the flow.
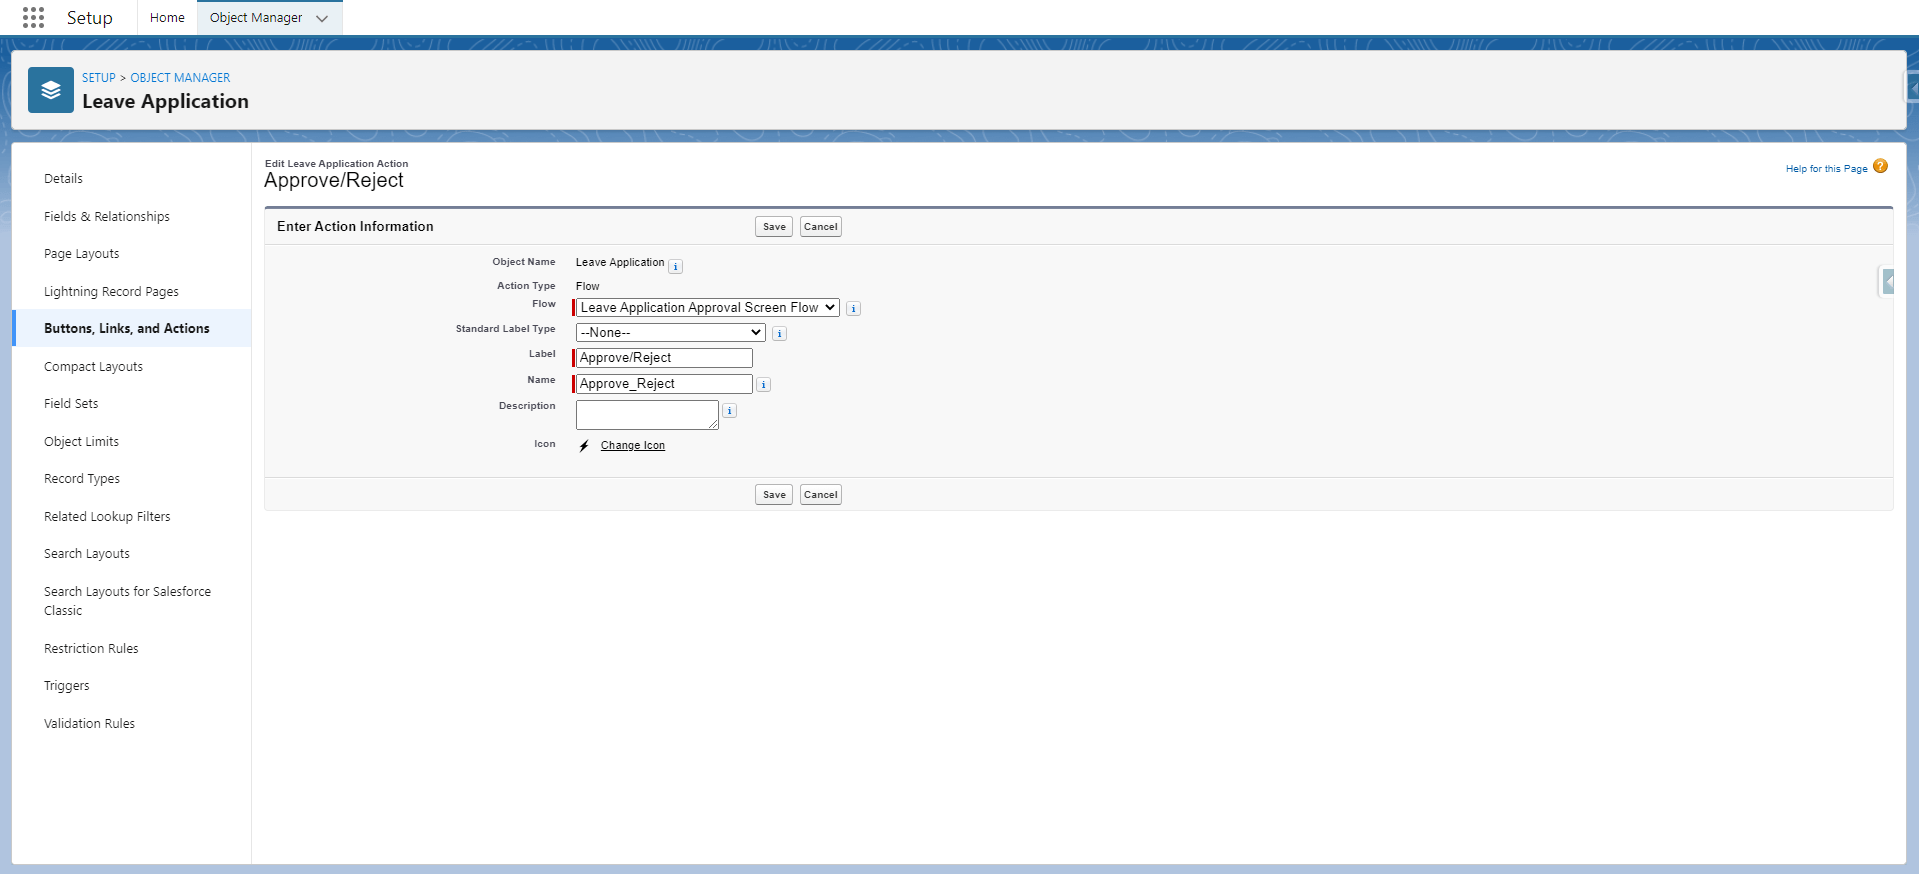
Your flow is ready so now create a quick action and add in the page layout.
Go to the record page and click on the quick action button.

You can find the full code here
Thank you 🙂

Why are we going with a screen flow, we could directly use the lwc right?