
We can send the custom notification (Bell Notification) from the Apex code. This feature was introduced in the Winter ’21 release and it is a very useful feature to notify the user of any changes/updates. There can be many use cases where you can use this feature to notify the user. I have used this feature to inform the users when asynchronous code executes in the background and after execution gets completed show the result of the execution in the bell notification.
Create custom notification in org.
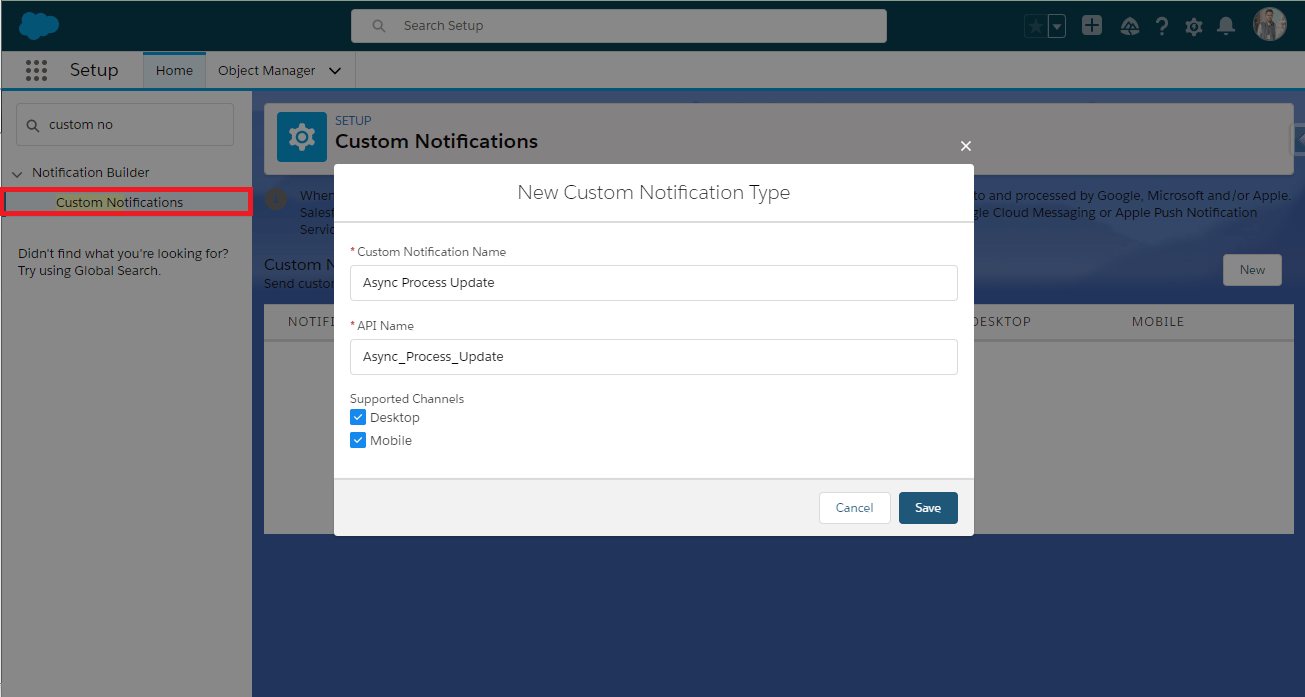
Go to setup > search ‘custom notification’. Click on the new button and create one.
CustomNotification class is used to create, configure and send the notification using Apex code.
We have 2 constructors of this “CustomNotification” class.
- CustomNotification(): using this we can create a new instance of Messaging.CustomNotification class.
- CustomNotification(typeId, sender, title, body, targetId, targetPageRef): we can create a new instance of Messaging.CustomNotification class with some specified parameters.
   <span style="color:#2b00a3;" class="has-inline-color">     // Get the Id for our custom notification type
        CustomNotificationType notificationType =
            [SELECT Id, DeveloperName
             FROM CustomNotificationType
             WHERE DeveloperName='Async_Process_Update'];
            // My_Custom_Notification (Enter the API Name of custom notification that you have created)

        // Create a new custom notification
        Messaging.CustomNotification notification = new Messaging.CustomNotification();

        // Set the contents for the notification
        notification.setTitle('Apex Custom Notification');
        notification.setBody('The notifications are coming from INSIDE async Apex!');

        // Set the notification type and target
        notification.setNotificationTypeId(notificationType.Id);
        notification.setTargetId(targetId);

        // Actually send the notification
        try {
            notification.send(recipientsIds);
        }
        catch (Exception e) {
            System.debug('Problem sending notification: ' + e.getMessage());
        }</span>
CustomNotification Methods :
| Methods | Description/Uses |
|---|---|
| send(users) | ✫ Sends a custom notification to the specified users. ✫ send(Set<string> users) : set of recipient ID to a recipient or recipient type. Valid recipient or recipient type values are: ✫ UserId — The notification is sent to this user, if this user is active. ✫ AccountId — The notification is sent to all active users who are members of this account’s Account Team. ✫ GroupId — The notification is sent to all active users who are members of this group. ✫ QueueId — The notification is sent to all active users who are members of this queue. All the types values can be combine and we can add upto 500. |
| setNotificationTypeId(id) | ✫ Sets the type of the custom notification. ✫ ID of custom notification type that you will create. ✫ This notification type is required to send. |
| setTitle(title) | ✫ Sets the title of the custom notification. ✫ The title of the notification, as it will be seen by recipients. Maximum characters: 250 ✫ Title is required to send. |
| setBody(body) | ✫ Sets the body of the custom notification. ✫ The body of the notification, as it will be seen by recipients. Maximum characters: 750. ✫ Body is required to send. |
| setSenderId(id) | ✫ Sets the sender of the custom notification. ✫ The user ID of sender of the custom notification. ✫ Optional |
| setTargetId(targetId) | ✫ Sets the target record of the custom notification. ✫ The Record ID for the target record of the custom notification so that user can nevigate to the record. ✫ Either target Id or pageRef is required. |
| setTargetPageRef(pageRef) | ✫ Sets the target page of the custom notification. ✫ The PageReference for the navigation target of the notification. ✫ Either target Id or pageRef is required. |


Great Article and very helpful. Also to fire custom notification from Flows checkout this article too https://www.accidentalcodersf.com/2020/11/send-custom-notifications-from-flow.html